
Chevrolet Corvette ZR1 (2019) Wheel Fitment
Chevrolet Corvette ZR1 (2019): 5x120.65 bolt pattern, 70.3mm center bore. Factory wheels: F: 19x10.0J R: 20x12.0J. Reference fitment ranges.
✓ Verified by ANKUSI's Engineering Team — IATF 16949 & ISO 9001 certified forged wheel manufacturer, TÜV/SFI/VIA compliant. See our factory & certifications →
Wheel Size & Offset at a Glance
| Configuration | Wheel Size & Offset |
|---|---|
| Factory (OE) | F: 19x10.0J R: 20x12.0J |
| Flush Fitment | F 19x10.5J ET35 / R 20x12.5J ET70 |
| Maximum Aggressive | F 20x11.0J ET30 / R 21x13.0J ET65 |
How to Read Wheel Offset & Measurements
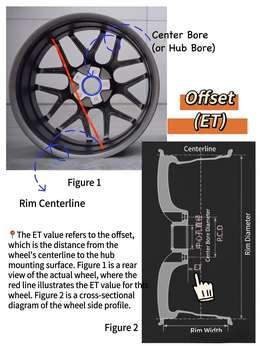
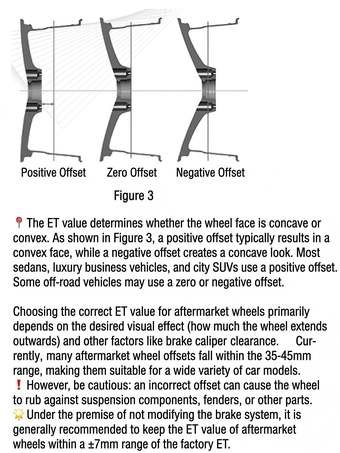
Use these two references before ordering: the left diagram shows where each spec (PCD, center bore, offset, width and diameter) is measured on the wheel; the right diagram shows how positive, zero and negative offset shift the wheel face relative to the hub centerline.
ANKUSI Engineering Expert Advice
Coupes and performance platforms are where rotational mass shows up fastest — in acceleration, in braking, and in how quickly the chassis changes direction. Forging lets us build to the same strength spec as the factory wheel at a meaningfully lower rotational weight, which is where the performance gain actually comes from, not just the visual one.
The Chevrolet Corvette ZR1 runs a 5x120.65 bolt pattern, 70.3mm center bore, and a F: 19x10.0J wheel from the factory. Our Flush Fitment reference is F 19x10.5J ET35 / R 20x12.5J ET70, which tucks the tire under the fender lip on a stock-height Chevrolet Corvette ZR1. Our Maximum Aggressive reference is F 20x11.0J ET30 / R 21x13.0J ET65 — beyond that offset, expect rubbing against the inner fender liner under compression without further trimming.
Chevrolet Corvette ZR1 OE Wheel Specs
The 2019 Chevrolet Corvette ZR1 (Coupe) uses a 5x120.65 bolt pattern with a 70.3mm center bore. Factory wheels are F: 19x10.0J R: 20x12.0J.
Why the factory spec works for most owners:
- Keeps unsprung weight low to preserve the factory handling balance
- Matches the wider, performance-oriented tire sizing typical of this platform
- Maintains clearance for the factory brake package and suspension geometry
- Balances grip with ride comfort for daily and spirited driving
Flush Fitment
For a flush look, F 19x10.5J ET35 / R 20x12.5J ET70 is a commonly used starting point — clearance must be verified on a stock or mildly lowered Chevrolet Corvette ZR1.
Maximum Aggressive Fitment
F 20x11.0J ET30 / R 21x13.0J ET65 is a more aggressive reference setup. Beyond this, expect rubbing under compression without fender rolling or camber correction.
5-Tier Configuration Options
A Factory-Style F 19x10.0J ET43 / R 20x12.0J ET79
Recommended setup: F 19x10.0J ET43 / R 20x12.0J ET79 | Economy impact: Negligible | Best for: Daily commuting, family use
Appearance: 7/10 | Comfort: 9.5/10 | Install difficulty: ★☆☆☆☆
Estimated cost: $450-800 (wheels + tires + install)
B Comfortable Upgrade F 19x10.5J ET39 / R 20x12.5J ET75
Recommended setup: F 19x10.5J ET39 / R 20x12.5J ET75 | Economy impact: -2 to -4% | Best for: Daily / street
Appearance: 8/10 | Comfort: 9/10 | Install difficulty: ★☆☆☆☆
Estimated cost: $1,950-2,550 (wheels + tires + install)
C Balanced / Flush Fit F 19x10.5J ET35 / R 20x12.5J ET70
Recommended setup: F 19x10.5J ET35 / R 20x12.5J ET70 | Economy impact: -4 to -6% | Best for: Street
Appearance: 8.5/10 | Comfort: 8/10 | Install difficulty: ★★☆☆☆
Estimated cost: $2,600-3,400 (wheels + tires + install)
D Aggressive F 20x11.0J ET33 / R 21x13.0J ET68
Recommended setup: F 20x11.0J ET33 / R 21x13.0J ET68 | Economy impact: -6 to -9% | Best for: Show / occasional track
Appearance: 9/10 | Comfort: 6.5/10 | Install difficulty: ★★★☆☆
Estimated cost: $3,900-5,000 (wheels + tires + install)
E Max Aggressive F 20x11.0J ET30 / R 21x13.0J ET65
Recommended setup: F 20x11.0J ET30 / R 21x13.0J ET65 | Economy impact: -8 to -12% | Best for: Show only
Appearance: 9.5/10 | Comfort: 4/10 | Install difficulty: ★★★★☆
Estimated cost: $4,800-6,200+ (wheels + tires + install)
Performance Comparison Matrix
| Metric | Tier A | Tier B | Tier C | Tier D | Tier E |
|---|---|---|---|---|---|
| Wheel Spec | F 19x10.0J ET43 / R 20x12.0J ET79 | F 19x10.5J ET39 / R 20x12.5J ET75 | F 19x10.5J ET35 / R 20x12.5J ET70 | F 20x11.0J ET33 / R 21x13.0J ET68 | F 20x11.0J ET30 / R 21x13.0J ET65 |
| Economy Impact | Negligible | -2 to -4% | -4 to -6% | -6 to -9% | -8 to -12% |
| Appearance | 7/10 | 8/10 | 8.5/10 | 9/10 | 9.5/10 |
| Comfort | 9.5/10 | 9/10 | 8/10 | 6.5/10 | 4/10 |
| Install Difficulty | ★☆☆☆☆ | ★☆☆☆☆ | ★★☆☆☆ | ★★★☆☆ | ★★★★☆ |
| Cost Range | $450-800 | $1,950-2,550 | $2,600-3,400 | $3,900-5,000 | $4,800-6,200+ |
| Best For | Daily commuting, family use | Daily / street | Street | Show / occasional track | Show only |
Real-World Reference Cases
The examples below are compiled from typical ANKUSI customer configurations and are labeled as reference cases, not individually verified real-world builds.
Case 1: Daily Driver (Factory-Style)
Profile: Everyday driving, prioritizes comfort and low running cost.
Setup: F 19x10.0J ET43 / R 20x12.0J ET79
Cost: ~$620
Outcome: Minimal visual change, ride and fuel economy essentially unaffected.
Case 2: Balanced Enthusiast (Balanced / Flush Fit)
Profile: Wants a sportier stance without sacrificing daily usability.
Setup: F 19x10.5J ET35 / R 20x12.5J ET70
Cost: ~$3,000
Outcome: Noticeable visual upgrade, fuel economy drop within the expected range.
Case 3: Show Build (Max Aggressive)
Profile: Built primarily for shows or occasional track/show use.
Setup: F 20x11.0J ET30 / R 21x13.0J ET65
Cost: ~$5,500
Outcome: Maximum visual impact; daily comfort and fuel economy are heavily compromised, physical test fit required before production.
Decision Guide
Offset & Backspacing Reference
Backspacing is calculated as wheel width (in) ÷ 2 + offset (mm) ÷ 25.4 + 0.5 (flange allowance):
- OE: F 19x10.0J ET43 → ~7.19″ F backspacing, R 20x12.0J ET79 → ~9.61″ R backspacing
- Flush: F 19x10.5J ET35 → ~7.13″ F backspacing, R 20x12.5J ET70 → ~9.51″ R backspacing
- Max: F 20x11.0J ET30 → ~7.18″ F backspacing, R 21x13.0J ET65 → ~9.56″ R backspacing
A Note on Clearance
Final clearance depends on the exact tire model, suspension height, brake package, alignment and vehicle tolerances. A physical test fit is recommended before production.
Want to check a different width or offset before you order? Use our Offset & Backspacing Calculator to solve the numbers yourself, or looking for your exact Chevrolet spec, or want a wheel built to a custom offset for your Chevrolet Corvette ZR1? Contact ANKUSI with your bolt pattern and offset target and we will confirm the correct forged wheel spec for your build.
Frequently Asked Questions
What bolt pattern (PCD) does the Chevrolet Corvette ZR1 use?
How many lug bolts does the Chevrolet Corvette ZR1 use?
What is the center bore size on the Chevrolet Corvette ZR1?
What size are the factory (stock) wheels on the Chevrolet Corvette ZR1?
What is the biggest wheel size I can fit on my Chevrolet Corvette ZR1 without rubbing?
What does a flush wheel fitment look like on the Chevrolet Corvette ZR1?
Do I need wheel spacers for my Chevrolet Corvette ZR1?
How do I calculate wheel backspacing for my Chevrolet Corvette ZR1?
What's the difference between wheel offset and backspacing?
Can I run staggered wheels (different sizes front and rear) on my Chevrolet Corvette ZR1?
Wheel Installation Reference: Torque, Thread & TPMS
Thread & Fastener: M12x1.5, conical-seat lug nut.
Factory Torque Spec: 136 Nm (100 ft-lb). Covers most Chevrolet passenger cars and crossovers on M12 studs.
TPMS: TPMS (Tire Pressure Monitoring System) has been federally mandated on all new light vehicles sold in the US since the 2008 model year. If your wheels use OE-style sensors, have them transferred or cloned to the new wheels at installation.
Tire Pressure: Always set tire pressure to the value on your vehicle's tire placard (driver's doorjamb or glovebox), not the max PSI printed on the tire sidewall — this is trim- and tire-size-specific and stays the same reference point when you switch to a different wheel and tire combination.
Reference data compiled from published OEM service specifications and cross-checked against independent repair sources; always confirm against your owner's manual or door-jamb placard before installation.